Options for Importing Categorical Variables
When importing data from REDCap using read_redcap(), you
have several options for handling coded categorical variables. These
options determine how the coded values are represented in your R
environment.
For this vignette, we will be using a sample classic project with a form that comprises most common REDCap data types.
library(REDCapTidieR)
token <- "123456789ABCDEF123456789ABCDEF04"
redcap_uri <- "https://my.institution.edu/redcap/api/"
Using raw_or_label = "raw" retrieves the raw coded
values for categorical variables. This approach preserves the original
coding, but you’ll need to separately reference the data dictionary from
REDCap to interpret the meaning of each code.
redcap_form <-
  read_redcap(
    redcap_uri,
    token,
    raw_or_label = "raw"
  ) |>
  extract_tibble("labelled_vignette")

redcap_form
#> # A tibble: 4 × 7
#>   record_id text_box_1 radio_buttons_1 checkbox___1 checkbox___2 checkbox___3
#>       <dbl> <chr>                <dbl>        <dbl>        <dbl>        <dbl>
#> 1         1 Record 1                 1            1            0            0
#> 2         2 Record 2                 2            1            1            0
#> 3         3 Record 3                 3            0            1            1
#> 4         4 Record 4                 1            0            0            0
#> # ℹ 1 more variable: form_status_complete <dbl>
The default option, raw_or_label = "label", replaces
each code with its corresponding label and converts categorical
variables into factors. This is convenient for analysis but discards the
original numeric codes, which may be necessary for tasks like data
cleaning or re-exporting to other formats (e.g., Stata or SPSS).
redcap_form <-
  read_redcap(
    redcap_uri,
    token,
    raw_or_label = "label"
  ) |>
  extract_tibble("labelled_vignette")

redcap_form
#> # A tibble: 4 × 7
#>   record_id text_box_1 radio_buttons_1 checkbox___1 checkbox___2 checkbox___3
#>       <dbl> <chr>      <fct>           <lgl>        <lgl>        <lgl>
#> 1         1 Record 1   A               TRUE         FALSE        FALSE
#> 2         2 Record 2   B               TRUE         TRUE         FALSE
#> 3         3 Record 3   C               FALSE        TRUE         TRUE
#> 4         4 Record 4   A               FALSE        FALSE        FALSE
#> # ℹ 1 more variable: form_status_complete <fct>
A third option, raw_or_label = "haven_labelled", imports
categorical variables as labelled vectors using the “haven_labelled”
class from the haven package
(cf. vignette("semantics", package = "haven")). This method
imports your categorical variables using their original coding and
attaches the corresponding value labels to them as metadata.
redcap_form <-
  read_redcap(
    redcap_uri,
    token,
    raw_or_label = "haven"
  ) |>
  extract_tibble("labelled_vignette")

redcap_form
#> # A tibble: 4 × 7
#>   record_id text_box_1 radio_buttons_1 checkbox___1 checkbox___2 checkbox___3
#>       <dbl> <chr>      <dbl+lbl>       <lgl>        <lgl>        <lgl>
#> 1         1 Record 1   1 [A]           TRUE         FALSE        FALSE
#> 2         2 Record 2   2 [B]           TRUE         TRUE         FALSE
#> 3         3 Record 3   3 [C]           FALSE        TRUE         TRUE
#> 4         4 Record 4   1 [A]           FALSE        FALSE        FALSE
#> # ℹ 1 more variable: form_status_complete <int+lbl>
Pros & Cons of Labelled Vectors
The "haven_labelled" class was originally developed to
import data from statistical software like SPSS, Stata, or SAS, which
use value labels for categorical variables. This format allows you store
both the original coding and the labels attached to each value.
Advantages
- Preservation of Original Coding: Both numeric codes and labels are retained, which is useful for data cleaning and re-exporting.
- Metadata Management: The labelled package offers functions to manage value labels effectively.
You can manipulate value labels using functions such as:
labelled::set_value_labels()labelled::get_value_labels()labelled::add_value_labels()labelled::remove_value_labels()
Additionally, you can search through variables or generate a variable
dictionary with labelled::look_for()
(cf. vignette("look_for", package = "labelled")):
library(labelled)
redcap_form |>
  look_for()
#>  pos variable             label col_type missing values
#>  1   record_id            —     dbl      0
#>  2   text_box_1           —     chr      0
#>  3   radio_buttons_1      —     dbl+lbl  0       [1] A
#>                                                  [2] B
#>                                                  [3] C
#>  4   checkbox___1         —     lgl      0
#>  5   checkbox___2         —     lgl      0
#>  6   checkbox___3         —     lgl      0
#>  7   form_status_complete —     int+lbl  0       [0] Incomplete
#>                                                  [1] Unverified
#>                                                  [2] Complete
Disadvantages
Labelled vectors are not optimized for data analysis tasks like descriptive statistics, plotting, or modeling. For these purposes, categorical variables should be converted to factors or numeric vectors.
Recommended Approaches

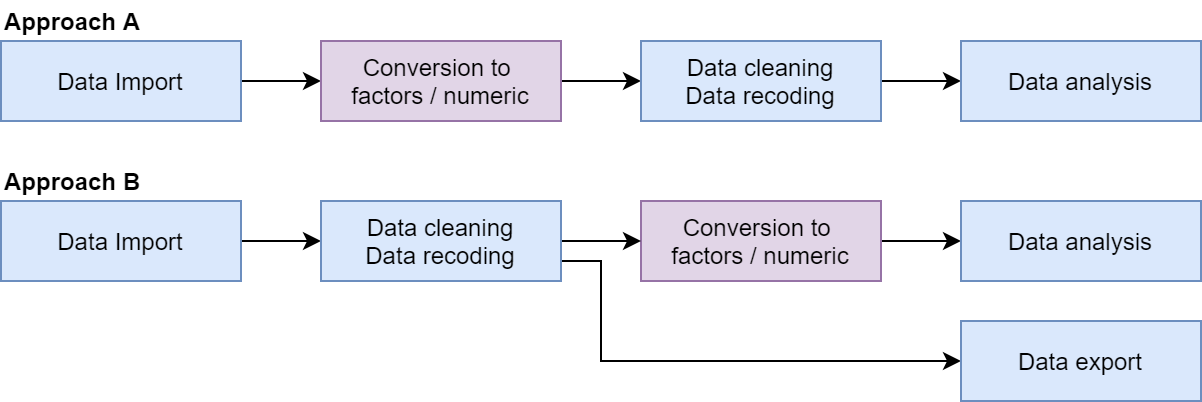
Approach A: Convert haven_labelled
vectors to factors or numeric/character vectors just after import using
functions like labelled::unlabelled(),
labelled::to_factor(), or unclass(). Proceed
with data cleaning, recoding, and analysis using standard R vector
types.
Approach B: Retain haven_labelled
vectors for data cleaning and coding to preserve original labels,
especially if you plan to re-export the data. Use labelled functions to
manage value labels, but convert the vectors to factors or numeric types
before performing analysis or modeling.
Managing Variable Labels
It’s important to distinguish between value labels and variable labels:
-
Value Labels: Describe the meaning of specific
values within a vector and change the vector’s class to
"haven_labelled". - Variable Labels: Provide a textual description of the entire variable without altering its class.
The labelled package offers functions to handle variable labels, such as:
Using REDCapTidieR::make_labelled() allows you to add
variable labels to data frames exported from REDCap:
redcap_form <-
  read_redcap(
    redcap_uri,
    token,
    raw_or_label = "haven"
  ) |>
  make_labelled() |>
  extract_tibble("labelled_vignette")

redcap_form |>
  look_for()
#>  pos variable             label                col_type missing values
#>  1   record_id            Record ID            dbl      0
#>  2   text_box_1           Text Box             chr      0
#>  3   radio_buttons_1      Radio Buttons        dbl+lbl  0       [1] A
#>                                                                 [2] B
#>                                                                 [3] C
#>  4   checkbox___1         Checkbox: A          lgl      0
#>  5   checkbox___2         Checkbox: B          lgl      0
#>  6   checkbox___3         Checkbox: C          lgl      0
#>  7   form_status_complete REDCap Instrument C~ int+lbl  0       [0] Incomplete
#>                                                                 [1] Unverified
#>                                                                 [2] Complete
This ensures that your data not only retains value labels but also includes descriptive labels for each variable, enhancing the readability and usability of your dataset.
